Showing posts with label Artists. Show all posts

Tuesday, April 24, 2012

Art Magazine Assignment


Hey ninth graders! Together we are going to create an Art Magazine featuring interviews with some of history´s most famous artist. In pairs, you will research an artist and write interviews (obviously fake, since most of them are dead), design nice layouts and print so we can later put them together. This is part one of our proyect and must be turned in on or before next tuesday, May 1st, and is worth 50 points.
Part two will be to create a conmemorative piece based on their artwork, the kind of things you see in a museum gift shop (coffee mugs, plates, T-shirts, stuff like that—the more original the better). This is due on or before Tuesday, May 8th, and is worth 25 points.

Here is how you will proceed today:

1)   Choose a partner (only one)

2)   Choose your artist from this list, and let me know right away
http://totallyhistory.com/art-history/famous-artists/

3)   Research this artist online and write an “interview” for an Art Review magazine. DON´T JUST ASK QUESTIONS—you must write about their work as well.
You may research artist interviews online for ideas. Here is a good one:

After you have your interview, email it to me (a.casals@gcnewhorizons.net). Start working on your layout, which will be two 8.5”x11” pages (just like in a magazine). Get images online. When you have finished designing, you must turn printed.


In the next class we will put the layouts together to create the magazine and start working on your museum pieces, unless you bring them from home.

Thursday, January 19, 2012

10th grade assignment: Joseph Cornell Boxes

Welcome back! Now that we´ve gotten our creative groove back with the Impossible Product Design project, it´s time to sink our teeth into something more ambitious. The following project you will have 3 or 4 weeks to complete (NOTE: next friday´s teacher training was cancelled so we will be working next week).
This purpose of this assignment is to create a personal cabinet or box. Just as you can’t judge a book by its cover, or a person by their outward appearance the problem that you must solve in creating this cabinet is for the inside and outside of this cabinet to be different. An object of contrasts!

One of the most famous and noted artists who worked with boxes and the concept of placing images inside a shadow type box was Joseph Cornell. Before you delve further into this assignment, you will be viewing work by Cornell and other artists who use boxes and altars as a means of expression.

Design Considerations:
Doors. You will be using a jigsaw. Curved lines work well. Angular cuts are very difficult to do. As you design the door front, think about the size and shape of the doors - can you actually cut them?
Outside Design, Color, Pattern, etc. What your completed cabinet looks like on the outside must be different from the inside. You can paint, stencil, draw, stamp, carve, and wood burn the outside of the cabinet. Think about adding to/extending top of the box (to make a "shrine" or retablos)

You can add items to the surface of the cabinet on the sides, doors, and top- remember to consider the weight and balance and how added items will contribute to stability.

Inside: The inside of the box should be personal and meaningful to you. This is not just a useful box or cabinet, this is being created as a work of art. Use the inside of this box to make a personal, political or other such artistically intriguing message. Everyone will be expected to view the web sites listed on the back of this page. 

Legs or No Legs: This is a design decision you must make. You will need to decide this before you actually build the cabinet. If there are legs- what shape, and size? Think about stability.
You will be expected to design this box on paper before you begin.

EVERYONE will be expected to view the following sites for ideas:
List some of the ideas you liked from the sites you visited. From these ideas, make another list of themes, messages, or personal statements that will be used inside your cabinet. 

Here is how you will proceed:
From today until next class (Jan. 27) you will gather your materials. Begin by getting your box (if you find nothing else, a shoebox will do but try to find a much nicer box). Also, start sketching the outside of your cabinet (the doors), how it will open and what design it will have. The first thing you will work on is the doors.

Then, you will bring all the materials and work in class. I also recommend you buy a small tube of UHU, i have some large ones but personal ones would be better to work with. I will sit with each of you to check your sketches, answer questions and monitor your progress. Afterwards, you will take what you have finished so far and finish it at home (if you haven´t in class).

On the final day (Feb. 3rd or 10th, depends how far along you are) you will present your boxes along with an Artist Statement.

Good Luck, Have Fun Creating!

Monday, November 7, 2011

Recycled Material Sculptures

It is with great, great pride that I finally post some of the sculptures 10th graders have made using recycled material. This project is from a unit on New Medium that I love teaching because the inspiration for it is one of my favorite artists, Vik Muñiz. Vik creates art using non-orthodox materials like cotton, wire, chocolate and even garbage, proving that art really is everywhere.

I start the unit by playing his Ted Speaks lecture and students oooh and aaah over his work (seriously, it´s amazing). We discuss how in postmodernism representational art is no longer limited to traditional medium or skills like drawing and painting, but creativity and originality are valued higher. Their assignment is to create sculptures using material they had never worked with before, except this year I gave it a twist—the material must be something which would have been thrown away, like old newspaper, plastic bottles, candy wrappers, etc. To make it even more challanging, the material must hold a relationship with the object they are representing (for example, last year a student made a doll out of newspaper, playing with the concept of a "paper doll"). And of course, applying the principles of design.

Oooh, and as if the project weren´t hard enough, I pushed them an extra mile by having them write an Artist´s Statement to accompany their work.

I´m trying to figure out how to upload them all without making the post too heavy, but in the meantime here are some of them. I am so thrilled and impressed with these kids, you can see why :-D


This one is called "Sweet Dreams" 

This one is "Haute couture rempli d´odures" and has a killer artist´s statement

This is a TP roll giraffe

A heart made of things that damage it

Another trash dress, this one made out of shopping bags and tags

This quirky piece is intended as "a funny critique to the daily invasion of all the junk published in newspaper"

This piece has got one of the best artist´s statements I have ever read, I´ll find a way to share it soon

"The hen that laid the rainbow eggs". Breathtaking!

This one is called "The Trash Fairy" and in her statement the artist explained it was inspired by her neat freak mom.

This one is deeply conceptual and is titled "The Americanization of the Dominican Republic". Brilliant!

This is the cutest self-portrait i´ve ever seen :-)

Cotton swans—soooo lovely

This one is the little kid´s favorite—Jack and Sally from Tim Burton´s The Nigthmare Before Christmas. Made from chocolate bar wrappers! These kids are too much :-D

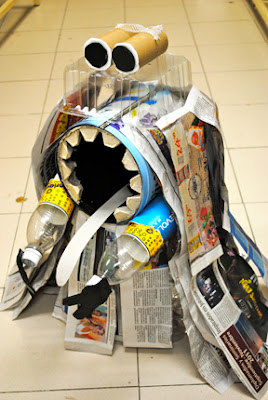
The Trash Monster!

A magazine lamp. Started out as a basket but I asked her to push it further...it´s still not finished though, I suggested some alterations

*If some of the images don´t load, click on one too see them all

Wednesday, October 26, 2011

Pop Art it is!


The winning modern art movement from last week´s assignment was POP ART (congrats Marlene and María, great job!), so this week´s assignment will be based on the work of it´s most notorious figure, Andy Warhol.

This will be a three part assignment which we will complete between this week and the next. The first part is written; Today I will hand you will a magazine article about Andy Warhol. After reading, I want you to extract 10 sentences with the information you personally found the most interesting, as well as answer the 3 questions that are on the magazine.

Also, check out the websites mentioned in the magazine to look at his work. Choose 3 different pieces and tell me why you like them or not (proper lexicon, please. Mention elements and principles of art). Email me your sentences, images and answers.

While you are reading, I will go around taking your picture. By the time you are finished, I will give you your digital picture and you will begin the second part of your assignment, which is to digitally manipulate it in photoshop to create a silkscreen print effect. Follow this tutorial. You´ll love it, it´s super cool :-). Email me your pimped up photo in jpg format.

Next week is the final assignment. You have to print ONE SQUARE (not all four, just ONE) of the photo in 8.5" x 11", prefferably in color but black and white is acceptable, and bring it in to class. We will create a lithograph using these, but this I will explain next week. If you do not bring the printed picture you cannot work, so DO NOT FORGET.

Good luck, and get to work!

Friday, October 21, 2011

Optical Art: Lines like Bridget Riley


A unit on Optical Art is always a big hit with 5th graders. I love it because non-representational art is fun to look at not too intimidating to make, so students who are not that skilled at drawing often surprise themselves by creating a wonderful piece. For this project, students studyied the life and work of Bridget Riley. I chose her because:

1) Students are not too familiar with women artists (and they should be!)
2) Her work is mostly composed of abstract line compositions and the elements of art are very easily identifiable
3) She was an art teacher too ;-)

On the first lesson we saw some cool optical illusions and defined the term. The next day we saw Bridget´s work and students were handed black construction paper and colored chalk to create similar composition —basically, parallel curved lines to create the illusion of movement. A very basic assignment with very different results. Here are some of them:


Then we took it a step further by working with shapes and complementary colors to make it pop out more. Like these:


Finally, the best part is when students go outside the box and apply what they learned to create completely original compositions, such as these:


We are currenlty woking on some Victor Vasarely checkerboard radials. Will post as soon as they´re finished, i´m sure they´ll be just as awesome :-)

Monday, October 17, 2011

What 8th graders are up to...

I haven´t posted any 8th grade projects because they are currently working on a big one. Since they are working with the Cartesian Plane in their Geometry class, I figured Grid Drawing would be appropriate.

First, we researched American artist Chuck Close. Students were handed, in pairs, a chapter of his biography which they had to summarize and present to the class. They learned how Close overcame his mental and physical disabilities and developed grid drawing to help him create his massive portraits. Next, we did some simple lineart grid excercises to help prepare for the BIG project: A value self-portrait using a grid. I took their picture (they all hate theirs but at 14 everyone hates they way they look anyways) and used Photoshop to enhance the tonal value. They created a big grid and began copying and enlarging their photos.


By this week most students have finished with the line drawings and next week will begin painting using only 4 shades of gray. They are doing great so far, here are some examples. I will post the end result when they are ready.

Saturday, October 8, 2011

Matisse Cut-out collages

It´s so hard to choose student work to post. I have approximately 50 students per grade level, so every project gives me around that many works to choose from. Sometimes they´re all so wonderful i hate to leave some out, as is the case of the 6th Grade Matisse Cutout collages.

6th graders had been learning about the Elements of Art in during the first unit and were ready to put their knowledge into practice. I chose to showcase French artist Henri Matisse for them since they are studying Europe in their Social Studies classes. We started the unit by reading and disscussing his biography, and discovering why he developed his "painting with scissors" collage technique. Next, students had to create their own cut-out collages using construction paper as paint. They made their sketches with both organic and geometric shapes and distributed them on their canvases, sometimes overlapping, considering positive and negative space. The different sizes and colors created very interesting texture.


I wish i could post all their work because they are seriously wonderful, but the longest blog post ever. Here are a couple chosen at random so i wouldn´t feel biased ;-)

Tuesday, October 4, 2011

Keith Haring Dance Party!


5th grade students have the most fun: We had a dance party in class the other day! It was actually a 3 part lesson regarding american artist Keith Haring and the Elements of Art. Here is how it went:

On DAY ONE we saw images of Keith Haring´s work and students identifyied the elements of art (line, shape, form, color, space, value and texture) within them, and they way they work in his compositions. Afterwards, students were handed a page with his biography and in pairs they summarized the main ideas. We later discussed discrimination and why ignorance equals fear.

DAY 2 was the most fun! Half the students get up while the other half remains seated and is handed different colored sheets of construction paper (3 each). 80s music is played while the students standing up dance. Suddenly, the music stops and dancers must freeze in their poses, becoming statues while the other half of the class draws their outline. This is repeated 3 times, one for each different color of construction paper. Next, the drawing students become the dancers and vice versa.


On DAY 3 students cut out their dancing shapes and pasted them onto poster board, trying to use space in an interesting way. Afterwards, they outlined their shapes with black marker and created radiant lines or movement lines (or both) around them. Voilá!


Finally, here is the finished work. Maginificent, isn´t it? :-D