Tuesday, April 24, 2012

Art Magazine Assignment


Hey ninth graders! Together we are going to create an Art Magazine featuring interviews with some of history´s most famous artist. In pairs, you will research an artist and write interviews (obviously fake, since most of them are dead), design nice layouts and print so we can later put them together. This is part one of our proyect and must be turned in on or before next tuesday, May 1st, and is worth 50 points.
Part two will be to create a conmemorative piece based on their artwork, the kind of things you see in a museum gift shop (coffee mugs, plates, T-shirts, stuff like that—the more original the better). This is due on or before Tuesday, May 8th, and is worth 25 points.

Here is how you will proceed today:

1)   Choose a partner (only one)

2)   Choose your artist from this list, and let me know right away
http://totallyhistory.com/art-history/famous-artists/

3)   Research this artist online and write an “interview” for an Art Review magazine. DON´T JUST ASK QUESTIONS—you must write about their work as well.
You may research artist interviews online for ideas. Here is a good one:

After you have your interview, email it to me (a.casals@gcnewhorizons.net). Start working on your layout, which will be two 8.5”x11” pages (just like in a magazine). Get images online. When you have finished designing, you must turn printed.


In the next class we will put the layouts together to create the magazine and start working on your museum pieces, unless you bring them from home.

Wednesday, March 28, 2012

1000 Origami Cranes for Fundación Amigos Contra el Cancer Infantil

Seventh graders are currently studying all things Japanese, so in art class we are doing a unit on Origami. After doing some test runs with very easy designs, we got ambitious and decided to try to make 1000 Origami Cranes, like the story of Sadako.We will be making these cranes for charity, to help children with cancer through the Fundación Amigos Contra el Cancer Infantil. Our goal* is to have 1000 cranes done by April 19th, so we can exhibit them on the 20th and sell them each that day to raise money for the foundation. Only 2 seventh grades are working on this project so we need all the help we can get! If you want to give a hand, you may follow this tutorial and create as many as you can. Finished cranes may be left in the CBNH library with Rose.

Remember, the most important step for origami is PATIENCE!


* Another important thing we talked about in class was the difference between a dream and a goal; Goals have a date! Otherwise, they are very hard to accomplish.

Thursday, January 19, 2012

10th grade assignment: Joseph Cornell Boxes

Welcome back! Now that we´ve gotten our creative groove back with the Impossible Product Design project, it´s time to sink our teeth into something more ambitious. The following project you will have 3 or 4 weeks to complete (NOTE: next friday´s teacher training was cancelled so we will be working next week).
This purpose of this assignment is to create a personal cabinet or box. Just as you can’t judge a book by its cover, or a person by their outward appearance the problem that you must solve in creating this cabinet is for the inside and outside of this cabinet to be different. An object of contrasts!

One of the most famous and noted artists who worked with boxes and the concept of placing images inside a shadow type box was Joseph Cornell. Before you delve further into this assignment, you will be viewing work by Cornell and other artists who use boxes and altars as a means of expression.

Design Considerations:
Doors. You will be using a jigsaw. Curved lines work well. Angular cuts are very difficult to do. As you design the door front, think about the size and shape of the doors - can you actually cut them?
Outside Design, Color, Pattern, etc. What your completed cabinet looks like on the outside must be different from the inside. You can paint, stencil, draw, stamp, carve, and wood burn the outside of the cabinet. Think about adding to/extending top of the box (to make a "shrine" or retablos)

You can add items to the surface of the cabinet on the sides, doors, and top- remember to consider the weight and balance and how added items will contribute to stability.

Inside: The inside of the box should be personal and meaningful to you. This is not just a useful box or cabinet, this is being created as a work of art. Use the inside of this box to make a personal, political or other such artistically intriguing message. Everyone will be expected to view the web sites listed on the back of this page. 

Legs or No Legs: This is a design decision you must make. You will need to decide this before you actually build the cabinet. If there are legs- what shape, and size? Think about stability.
You will be expected to design this box on paper before you begin.

EVERYONE will be expected to view the following sites for ideas:
List some of the ideas you liked from the sites you visited. From these ideas, make another list of themes, messages, or personal statements that will be used inside your cabinet. 

Here is how you will proceed:
From today until next class (Jan. 27) you will gather your materials. Begin by getting your box (if you find nothing else, a shoebox will do but try to find a much nicer box). Also, start sketching the outside of your cabinet (the doors), how it will open and what design it will have. The first thing you will work on is the doors.

Then, you will bring all the materials and work in class. I also recommend you buy a small tube of UHU, i have some large ones but personal ones would be better to work with. I will sit with each of you to check your sketches, answer questions and monitor your progress. Afterwards, you will take what you have finished so far and finish it at home (if you haven´t in class).

On the final day (Feb. 3rd or 10th, depends how far along you are) you will present your boxes along with an Artist Statement.

Good Luck, Have Fun Creating!

Tuesday, November 8, 2011

Chinese Landscape Scrolls

 
7th graders´ Social Studies curriculum focuses on Asia and so does their art program. They have explored Hindu Mandalas, Chinese Dragons and Beijing Opera Masks and recently we had a chance to try out some landscape scroll paintings.

For homework they had to research the main characteristics of these paintings and frequent subjects (cherry and blossoms, waterfalls, bamboo, and chrysanthemums)  and later in class they tried watercoloring their own designs based on these characteristics.

They are all very beautiful, but these are some of the ones that looked the most "chinese" ;-)


Haida Indians Masks

  
5th graders are studying the U.S. and Canada in their Social Studies classes, and they love all things Native American, so for Halloween I had them create masks like the Haida Indians of the Pacific Northwest Coast. They first had to research these masks in the internet and bring in examples. In class we compared them to see the common features. We saw that they all had very bushy eyebrows, the eyes were pinched at the end, like footballs. Also, we saw that the lips were rounded and looked like two hot dogs, and that they covered all the negative space with designs.

The first week we taped cardboard triangles on paper plates to create a nose shape, and covered the entire thing with papier-maché (no need to say how much they loooved doing this).


The following week they brought in sketches they had made and painted their masks, just in time for the school´s Halloween fair. I have to admit I´m quite impressed with these, they are so much better than I had anticipated—and, mind you, my expectations for this group are very high ;-)


Monday, November 7, 2011

Recycled Material Sculptures

It is with great, great pride that I finally post some of the sculptures 10th graders have made using recycled material. This project is from a unit on New Medium that I love teaching because the inspiration for it is one of my favorite artists, Vik Muñiz. Vik creates art using non-orthodox materials like cotton, wire, chocolate and even garbage, proving that art really is everywhere.

I start the unit by playing his Ted Speaks lecture and students oooh and aaah over his work (seriously, it´s amazing). We discuss how in postmodernism representational art is no longer limited to traditional medium or skills like drawing and painting, but creativity and originality are valued higher. Their assignment is to create sculptures using material they had never worked with before, except this year I gave it a twist—the material must be something which would have been thrown away, like old newspaper, plastic bottles, candy wrappers, etc. To make it even more challanging, the material must hold a relationship with the object they are representing (for example, last year a student made a doll out of newspaper, playing with the concept of a "paper doll"). And of course, applying the principles of design.

Oooh, and as if the project weren´t hard enough, I pushed them an extra mile by having them write an Artist´s Statement to accompany their work.

I´m trying to figure out how to upload them all without making the post too heavy, but in the meantime here are some of them. I am so thrilled and impressed with these kids, you can see why :-D


This one is called "Sweet Dreams" 

This one is "Haute couture rempli d´odures" and has a killer artist´s statement

This is a TP roll giraffe

A heart made of things that damage it

Another trash dress, this one made out of shopping bags and tags

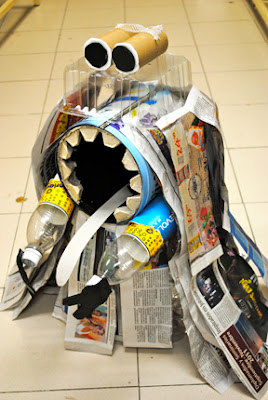
This quirky piece is intended as "a funny critique to the daily invasion of all the junk published in newspaper"

This piece has got one of the best artist´s statements I have ever read, I´ll find a way to share it soon

"The hen that laid the rainbow eggs". Breathtaking!

This one is called "The Trash Fairy" and in her statement the artist explained it was inspired by her neat freak mom.

This one is deeply conceptual and is titled "The Americanization of the Dominican Republic". Brilliant!

This is the cutest self-portrait i´ve ever seen :-)

Cotton swans—soooo lovely

This one is the little kid´s favorite—Jack and Sally from Tim Burton´s The Nigthmare Before Christmas. Made from chocolate bar wrappers! These kids are too much :-D

The Trash Monster!

A magazine lamp. Started out as a basket but I asked her to push it further...it´s still not finished though, I suggested some alterations

*If some of the images don´t load, click on one too see them all

Saturday, November 5, 2011

Gallon Goblins for Halloween

A couple of weeks ago 6 III was working on recycling the crayon stubs from the Art Room, but 6 IV had a different task: They had to create something using empty plastic gallons which used to hold paint and glue. First, they covered them in Papier-maché newspaper.


The following week they did it again but using white paper so they could paint over them.


When they had dried, I left it up to them to design their own creations. I showed them some ideas from the internet for inspiration. Since Halloween was coming up, they all decided to make these little monsters, jack-o-lanterns or goblins. Super cute! Some used them for trick-or-treating and others were borrowed as decorations for the Halloween Fair at school.